
Lombok is a powerful Java library that reduces boilerplate code by automatically generating getters, setters, constructors, and other common methods using simple annotations.
To enable Processor Lombok in IntelliJ, install the Lombok plugin via File > Settings > Plugins. Then, go to Settings > Build, Execution, Deployment > Compiler > Annotation Processors and check “Enable annotation processing.”
This comprehensive guide walks you through the process of enabling Processor Lombok in IntelliJ IDEA, including installation, configuration, and troubleshooting tips to streamline your Java development experience as of June 02, 2025.
What is Lombok and Why Use It?
Lombok simplifies Java development by eliminating repetitive code. Instead of manually writing getters, setters, toString, equals, hashCode, and constructors, you can use annotations like @Getter, @Setter, @Data, or @AllArgsConstructor.
These annotations are processed at compile time, generating the necessary code automatically. This leads to cleaner, more readable, and maintainable code, saving developers time and reducing errors.
To use Lombok effectively in IntelliJ IDEA, you need to:
- Install the Lombok plugin.
- Add Lombok as a dependency in your project.
- Enable annotation processing in IntelliJ.
- Use Lombok annotations in your code.
- Rebuild your project to ensure everything works smoothly.
Below, we’ll dive into each step in detail, ensuring you can enable Processor Lombok in IntelliJ seamlessly.
Step 1: Install the Lombok Plugin in IntelliJ IDEA
IntelliJ IDEA requires a plugin to recognize Lombok annotations and provide features like code completion, navigation, and refactoring. Here’s how to install it:
- Open IntelliJ IDEA: Launch your IntelliJ IDEA IDE.
- Navigate to Settings/Preferences:
- On Windows/Linux: Go to File > Settings.
- On macOS: Go to IntelliJ IDEA > Preferences.
- Access the Plugins Section:
- In the left sidebar, select Plugins.
- Click on the Marketplace tab.
- Search for Lombok:
- Type “Lombok” in the search bar.
- Look for the “Lombok” plugin by Michail Plushnikov (a widely trusted plugin for Lombok support).
- Install the Plugin:
- Click the Install button next to the Lombok plugin.
- Once installed, click Restart IDE to apply the changes.
- Verify Installation:
- After restarting, return to Settings > Plugins > Installed and confirm the Lombok plugin is listed and enabled.
Pro Tip: Since IntelliJ IDEA 2020.3, Lombok support is partially built-in, but installing the plugin enhances functionality, especially for older versions or advanced features. Always check for plugin updates for bug fixes and compatibility with the latest IntelliJ releases.
Also Read: Best AM4 CPU – Secret Tips for Gamers and Creators!
Step 2: Add Lombok as a Dependency in Your Project
Lombok must be included as a dependency in your project’s build file for the compiler to process annotations. The process varies depending on your build tool (Maven or Gradle).
For Maven Projects
If you’re using Maven, add the Lombok dependency to your pom.xml file:
<dependencies>
<dependency>
<groupId>org.projectlombok</groupId>
<artifactId>lombok</artifactId>
<version>1.18.36</version>
<scope>provided</scope>
</dependency>
</dependencies>
- Version: As of June 02, 2025, version 1.18.36 is recommended, but check Maven Central for the latest version.
- Scope: The provided scope ensures Lombok is used during compilation but not included in the final build, as the generated code is already embedded.
After adding the dependency, right-click your pom.xml in IntelliJ and select Maven > Reload Project to update the configuration.
For Gradle Projects
For Gradle projects, modify your build.gradle file to include Lombok:
dependencies {
compileOnly ‘org.projectlombok:lombok:1.18.36’
annotationProcessor ‘org.projectlombok:lombok:1.18.36’
testCompileOnly ‘org.projectlombok:lombok:1.18.36’
testAnnotationProcessor ‘org.projectlombok:lombok:1.18.36’
}
- compileOnly: Ensures Lombok is available for compilation but not runtime.
- annotationProcessor: Allows Lombok to process annotations during the build.
- Test Variants: Include these for Lombok to work in test classes.
Sync your project by clicking the “Refresh Gradle Project” button in IntelliJ’s Gradle tool window.
Pro Tip: Always use the latest Lombok version for new features and compatibility. If you encounter issues, verify the version matches across all dependencies and check Lombok’s changelog for updates.
Read More: What Should My Processor Temp Be: Tips to Stay Cool – 2025
Step 3: Enable Annotation Processing in IntelliJ
Lombok relies on annotation processing to generate code during compilation. IntelliJ needs to be configured to enable this:
- Open Settings/Preferences:
- On Windows/Linux: File > Settings.
- On macOS: IntelliJ IDEA > Preferences.
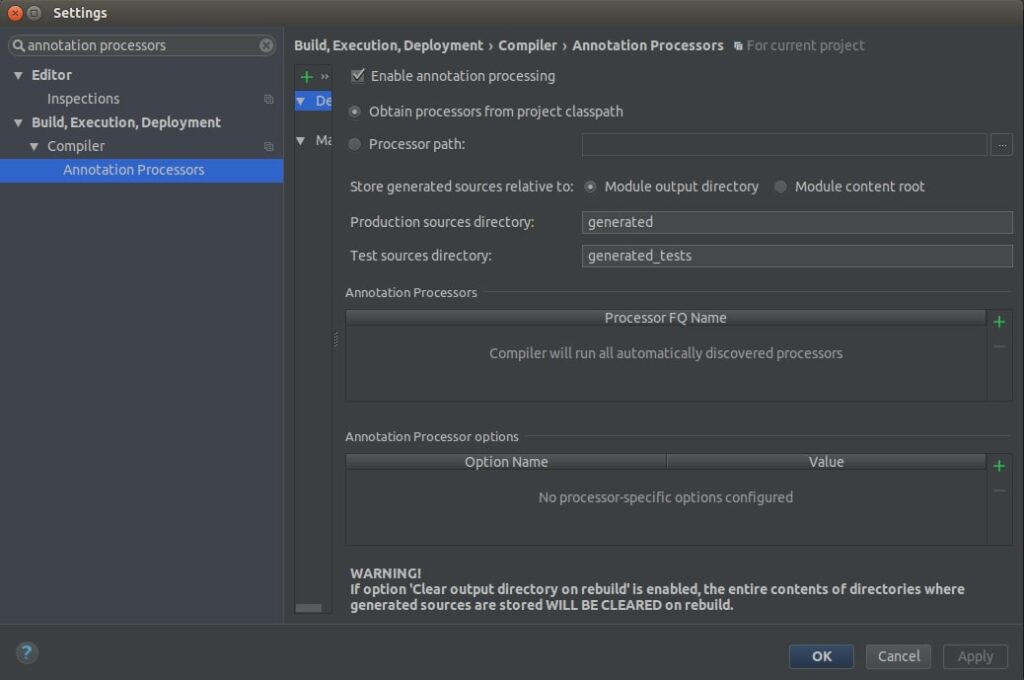
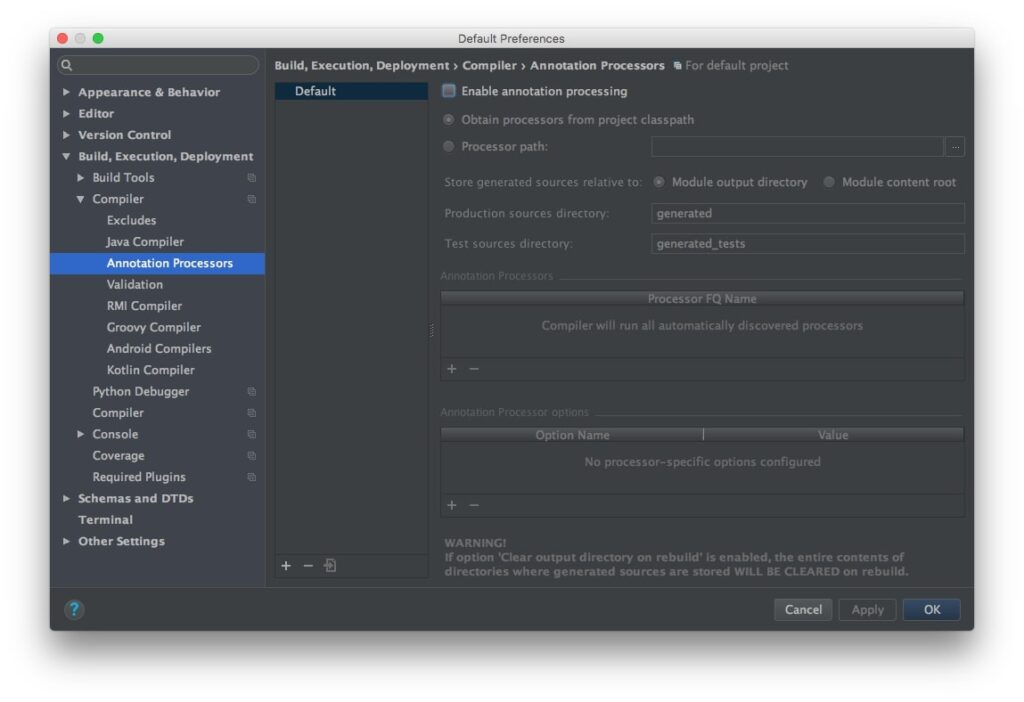
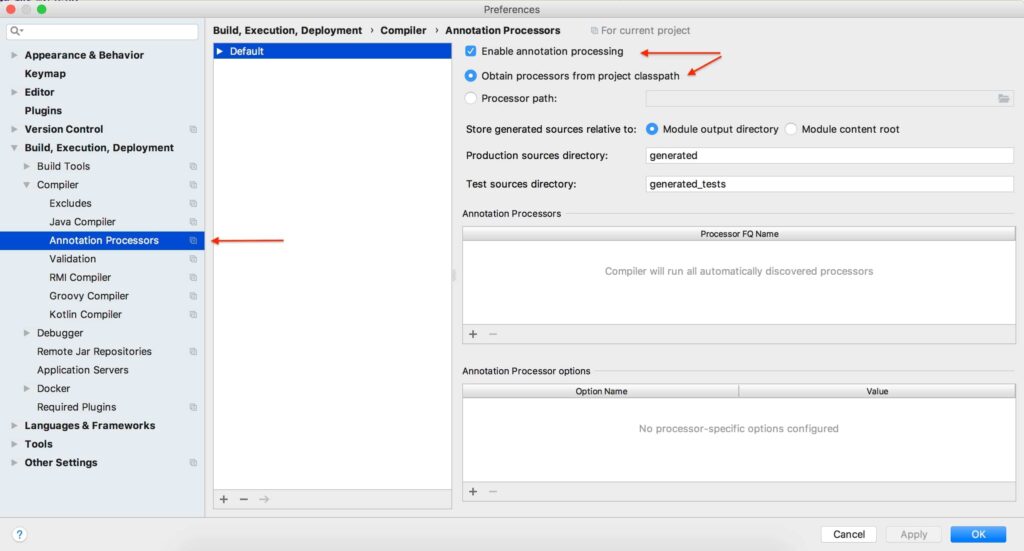
- Navigate to Annotation Processors:
- Go to Build, Execution, Deployment > Compiler > Annotation Processors.
- Enable Annotation Processing:
- Check the box labeled Enable annotation processing.
- Configure Processor Path (Optional):
- By default, IntelliJ can obtain processors from the project classpath (recommended for Maven/Gradle projects).
- If issues persist, switch to “Obtain processors from project classpath” or manually specify the path to the Lombok JAR (e.g., ~/.m2/repository/org/projectlombok/lombok/1.18.36/lombok-1.18.36.jar).
- Apply Changes:
- Click OK or Apply to save the settings.
Pro Tip: Ensure this setting is enabled for all profiles or create a new profile for specific modules in multi-module projects. This step is critical for Lombok to generate methods like getters and setters.
Step 4: Use Lombok Annotations in Your Code
Now that the plugin and dependency are set up, you can start using Lombok annotations. Here’s an example of a simple Java class with Lombok:
import lombok.Data;
@Data
public class User {
private String username;
private String password;
private int age;
}
- @Data: This annotation generates getters, setters, toString, equals, and hashCode methods automatically.
- Other common annotations include:
- @Getter: Generates getters for all fields.
- @Setter: Generates setters for all non-final fields.
- @AllArgsConstructor: Creates a constructor with all fields.
- @NoArgsConstructor: Creates a no-argument constructor.
- @Slf4j: Adds a logger field (e.g., for SLF4J logging).
After adding annotations, IntelliJ should recognize the generated methods, and you can use them in your code without manual implementation. For example, you can call user.getUsername() or user.setAge(25) without writing these methods explicitly.
Step 5: Rebuild Your Project
To ensure Lombok is working correctly, rebuild your project:
- Rebuild in IntelliJ:
- Go to Build > Rebuild Project.
- Alternatively, use the shortcut:
- Windows/Linux: Ctrl + Shift + F9.
- macOS: Cmd + Shift + F9.
- Check for Errors:
- If compilation succeeds, Lombok is processing annotations correctly.
- If errors like “cannot find symbol” (e.g., getUsername or log) appear, revisit the previous steps.
Pro Tip: If issues persist, try File > Invalidate Caches / Restart and select Invalidate and Restart. This clears IntelliJ’s cache, which can resolve configuration conflicts.
Troubleshooting Common Issues
Even with proper setup, you might encounter issues. Here are common problems and solutions:
- “Cannot find symbol” Errors:
- Cause: Annotation processing is disabled, or the plugin isn’t installed/enabled.
- Solution: Verify Enable annotation processing is checked, and the Lombok plugin is installed and enabled in Settings > Plugins.
- Lombok Not Recognized in Multi-Module Projects:
- Cause: Annotation processing might be enabled only for specific modules.
- Solution: Ensure annotation processing is enabled for the parent module or all relevant modules in a mono-repo setup.
- Compiler Issues:
- Cause: IntelliJ may not use a supported compiler (Lombok supports javac and ECJ).
- Solution: Switch to “Obtain processors from project classpath” in Settings > Build, Execution, Deployment > Compiler > Annotation Processors. Alternatively, update Lombok to the latest version.
- Cache or Configuration Conflicts:
- Cause: IntelliJ’s cache or project files (.idea, .iml) may be corrupted.
- Solution: Invalidate caches via File > Invalidate Caches / Restart, delete .idea folders and .iml files, and re-import the project.
- Dependency Version Mismatch:
- Cause: Mismatched or missing Lombok version in pom.xml or build.gradle.
- Solution: Explicitly specify the latest Lombok version (e.g., 1.18.36) and reload the project.
Read Out: Do Intel K Processors Have Integrated Graphics: Must Read!
Additional Tips for Success
- Check Compatibility: Ensure the Lombok plugin and dependency versions are compatible with your IntelliJ IDEA version. For example, older plugins may not work with IntelliJ 2024.3 or later.
- Spring Boot Projects: Since Spring Boot made Lombok optional, explicitly add it to pom.xml or build.gradle as shown above.
- Keep Updated: Regularly check for updates to the Lombok plugin and dependency for new features, bug fixes, and compatibility with IntelliJ and Java versions.
- Explore Annotations: Beyond @Data, experiment with annotations like @Builder for fluent object creation or @Slf4j for logging to enhance productivity.
Conclusion
Enabling Processor Lombok in IntelliJ IDEA is a straightforward process that can significantly boost your Java development productivity. By installing the Lombok plugin, adding the dependency, enabling annotation processing, using annotations, and rebuilding your project, you’ll write cleaner, more concise code. Troubleshooting steps ensure you can resolve common issues like “cannot find symbol” errors or configuration conflicts. As of June 02, 2025, following these steps will help you leverage Lombok’s full potential in IntelliJ IDEA, making your Spring Boot or Java projects more efficient and enjoyable to work on. Happy coding!
FAQs
How to enable Lombok on IntelliJ?
Hey! To use Lombok in IntelliJ, install the Lombok plugin from Settings > Plugins, add it to your project, and enable annotation processing.
How do I enable annotation processors in IntelliJ?
It’s simple! Go to File > Settings > Build, Execution, Deployment > Compiler > Annotation Processors, then check “Enable annotation processing” and save.
How to enable JPA structure in IntelliJ?
No worries! Open IntelliJ, go to File > Project Structure, add JPA under Frameworks, set up your database, and you’re good to go!
How to enable plugins in IntelliJ?
Super easy! Head to File > Settings > Plugins, search for your plugin, click Install, then restart IntelliJ to start using it.
How do I activate Lombok?
Let’s do it! Add Lombok to your project’s build file, install the IntelliJ plugin, and turn on annotation processing in Settings.
How to enable Java in IntelliJ?
You’ve got this! Open File > Project Structure, set up a JDK under SDKs, choose Java as the language, and hit Apply.
How do I enable annotation processing in Eclipse?
It’s a breeze! In Eclipse, go to Project > Properties > Java Compiler > Annotation Processing, check “Enable annotation processing,” and click OK.
How do I enable Vim in IntelliJ?
Love Vim? Go to File > Settings > Plugins, search for “IdeaVim,” install it, restart IntelliJ, and enjoy Vim keybindings right away!