When you power on your computer, a complex sequence of events unfolds to bring your system to life. One critical phase in this process is the CPU DXE Initialization, often indicated by the message “CPU DXE Initialization Is Started” on your motherboard’s debug display, typically accompanied by Q-codes 63–67.
This indicates the UEFI/BIOS is configuring the CPU during the boot process’s DXE phase, ensuring proper hardware setup, memory initialization, and system stability (Q-codes 63–67).
This article dives deep into what CPU DXE Initialization entails, its significance, common issues, and troubleshooting steps to ensure a smooth boot process. Drawing from insights across various technical forums and guides, we’ll explore this essential part of your computer’s startup sequence.
What is CPU DXE Initialization?
CPU DXE Initialization is a pivotal stage in the computer’s boot process, occurring within the Driver Execution Environment (DXE) phase of the Unified Extensible Firmware Interface (UEFI) or BIOS firmware.
The DXE phase follows the Pre-EFI Initialization (PEI) phase, which sets up permanent memory, allowing the DXE phase to load and execute drivers necessary for system initialization.
During CPU DXE Initialization, the system firmware configures the central processing unit (CPU) and its associated components, preparing them for the operating system (OS) to take control.
Key tasks performed during CPU DXE Initialization include:
- Hardware Detection: The firmware identifies the CPU model, clock speed, and other specifications.
- Configuration: CPU registers, memory controllers, and cache settings are configured for optimal performance.
- Memory Initialization: The firmware sets up memory modules and addressing to ensure proper allocation.
- Power Management: Features like voltage regulation and frequency scaling are initialized to balance performance and efficiency.
This phase ensures the CPU is ready to execute instructions and communicate effectively with other system components, laying the foundation for a stable and efficient boot.
Once completed, the DXE phase hands over control to the Boot Device Selection (BDS) phase, which attempts to load the operating system. If successful, the DXE phase terminates, leaving only runtime data structures to persist in the OS environment.
Also Read: Best Intel Processor For Gaming – Power Up Your 2025 Rig!
Why is CPU DXE Initialization Important?
CPU DXE Initialization is crucial because it establishes the groundwork for your computer’s operation. Without proper initialization, the CPU may fail to communicate with other hardware components, leading to system instability, boot failures, or performance issues. This phase ensures:
- Hardware Compatibility: The CPU is configured to work seamlessly with the motherboard, memory, and other peripherals.
- System Stability: Proper settings reduce the risk of crashes or errors during operation.
- Performance Optimization: Correct initialization of cache, memory, and power management features maximizes CPU efficiency.
For example, a user on Tom’s Hardware reported a Gigabyte Z370 Aorus Gaming 7 motherboard displaying a Q-code 66, indicating CPU DXE Initialization.
Despite the error code, the system functioned normally, suggesting that not all instances of this message indicate a critical issue. However, persistent errors or boot failures require attention.
UEFI Boot Flow in 60 Seconds (and Where DXE Fits)
A simplified UEFI sequence:
- SEC (Security) – CPU comes out of reset, minimal environment created.
- PEI (Pre-EFI Initialization) – Temporary memory (cache-as-RAM) and early silicon init to find permanent memory.
- DXE (Driver Execution Environment) – DXE Core loads drivers that bring up the rest of the system; CPU services and the IMC/RAM are fully established here; Boot & Runtime Services become available.
- BDS (Boot Device Selection) – Picks a boot target and launches it.
- RT (Runtime) – After ExitBootServices(), control ultimately goes to the OS.
Many platform security features (e.g., UEFI Secure Boot) verify components beginning in DXE. So failures here can be hardware-, firmware-, or policy-related.
Common Issues with CPU DXE Initialization
While CPU DXE Initialization is typically seamless, errors can occur, often indicated by Q-codes 63–67 or related messages. Common issues include:
- Hardware Incompatibilities: Mismatched CPU, motherboard, or RAM can disrupt initialization.
- Faulty Components: Defective RAM, CPU, or motherboard may cause the system to hang.
- Outdated Firmware: An outdated BIOS may lead to improper CPU configuration.
- Overclocking: Pushing the CPU or RAM beyond stable limits can trigger errors, as noted in an ASUS ROG forum post where a Q-code 67 appeared when RAM was set above 2800MHz.
- Loose Connections: Poorly seated RAM, CPU, or power cables can interrupt the process.
For instance, a Reddit user described a system hanging at Q-code 64, leading to slow boot times. Another user on the Overclockers forum resolved a Q-code 67 issue by reseating RAM, highlighting a common fix for such errors.
Read More: LGA 1151 Processor List: Features, Benefits & Buying Tips
Troubleshooting CPU DXE Initialization Errors
If your system displays a CPU DXE Initialization error (e.g., Q-codes 63–67) and fails to boot or exhibits instability, try these troubleshooting steps:
- Check Hardware Connections: Ensure the CPU, RAM, and power cables are securely connected.
- Reseat RAM: Remove and reinsert RAM modules, testing with one stick at a time to identify faulty modules.
- Update BIOS/Firmware: Download the latest BIOS version from the motherboard manufacturer’s website to improve compatibility and stability.
- Reset BIOS Settings: Clear the CMOS by removing the motherboard battery or using the jumper to reset settings to default.
- Test with Onboard Graphics: Remove the GPU and connect the monitor to the motherboard’s onboard display to rule out graphics card issues.
- Run Diagnostics: Use built-in motherboard diagnostics or software tools to check for hardware faults.
- Verify Compatibility: Confirm that the CPU, RAM, and motherboard are compatible, especially if overclocking or using non-standard configurations.
A user on the GIGABYTE USA Forum reported that reseating RAM resolved a Q-code 66 issue, while another on PCPartPicker found that a faulty motherboard caused CPU damage, emphasizing the importance of thorough diagnostics.
Advanced Considerations
For advanced users, CPU DXE Initialization can be customized to optimize performance, particularly in overclocking scenarios.
For example, adjusting DRAM voltage or timings in the BIOS, as suggested in an ASUS ROG forum post, can stabilize high-frequency RAM.
However, modifying firmware settings requires caution, as improper changes can lead to system instability.
Developers working on custom firmware may also leverage debugging capabilities, such as hardware breakpoints or trace buffers, to fine-tune the initialization process.
Quick Reference: AMI/Aptio DXE-Related POST Codes
The exact map varies by vendor and board, but AMI Aptio documentation commonly lists the following around DXE:
| Code | Meaning (AMI/Aptio) |
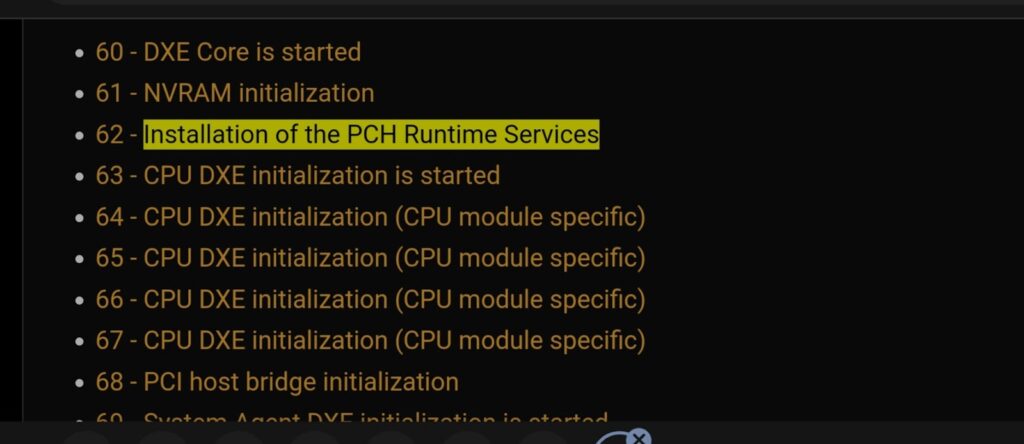
| 0x60 | DXE Core is started |
| 0x61 | NVRAM initialization |
| 0x62 | South Bridge Runtime Services installation |
| 0x63 | CPU DXE initialization is started |
| 0x64–0x67 | CPU DXE initialization (module-specific steps) |
| 0x68 | PCI host bridge initialization |
| 0x69–0x6B | North Bridge / System Agent DXE initialization (incl. SMM) |
Use your exact motherboard manual for authoritative mappings; some vendors repurpose ranges or add board-specific meanings.
Is It Normal to See 0x63–0x67 Briefly?
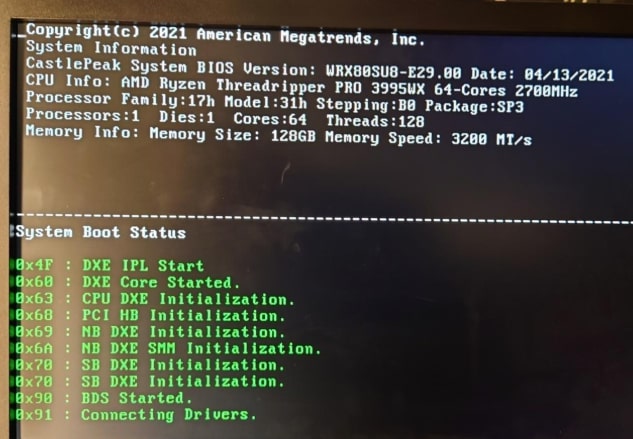
Yes—on many boards, a quick flash of 0x63–0x67 (or the text “CPU DXE initialization is started”) is normal and indicates progress through DXE.
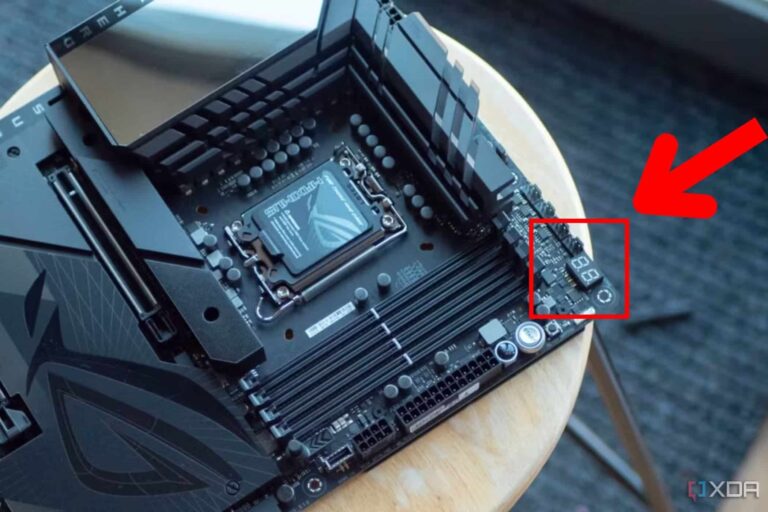
Users often notice it after adding a Q-code display board or when boot suddenly slows or hangs; don’t panic unless it stops there or repeats.
Community threads report seeing code 66 during healthy boot operations on specific Gigabyte Z-series boards.
You Should Know: Is CS2 GPU Or CPU Intensive – A Complete Guide In 2025!
CPU DXE initialization is started code 64
Code 64 usually shows during the DXE phase when the CPU and memory controller are being set up. If the system freezes here, it often means unstable RAM, wrong BIOS settings, or the CPU isn’t seated correctly.
CPU DXE Initialization is started Lenovo
On Lenovo desktops or laptops, this message appears during startup while the CPU and drivers are getting ready.
If it stays stuck, try resetting BIOS, updating firmware, or removing faulty RAM. Usually, it passes quickly in normal boots.
CPU Post Memory Initialization
This stage occurs when the computer checks and prepares memory before the operating system is loaded. If memory is unstable, mismatched, or not supported, the process can stop here. Testing each RAM stick one by one often helps find issues.
PCH DXE initialization
The Platform Controller Hub (PCH) is like a traffic manager for the system. During DXE initialization, it sets up communication between the CPU, storage, and input devices. If problems occur here, it often relates to motherboard firmware or chipset drivers.
NVRAM initialization
NVRAM stores BIOS settings, such as boot order and hardware configuration. Initialization means these saved settings are being read during startup.
If corruption occurs, the system may fail to continue. Clearing CMOS or resetting BIOS to defaults usually fixes the error.
DXE_CPU_ERROR
This error means the system failed while loading CPU-related drivers during the DXE phase. It could be bad RAM, unstable overclocking, outdated BIOS, or a faulty CPU.
Resetting settings, updating firmware, and reseating the processor are common troubleshooting steps.
Must Know: AM3 Processor List – A Comprehensive Guide In 2025!
Super IO initialization
Super I/O chips control legacy parts such as fans, sensors, or serial ports. During initialization, the firmware sets these up.
If the system halts here, it may be due to BIOS corruption or faulty motherboard components managing hardware control.
FAQs
1. What does “CPU DXE Initialization Is Started” mean?
This message indicates that the system firmware is initializing the CPU during the Driver Execution Environment (DXE) phase of the boot process. It configures the CPU, memory, and other components to prepare for the operating system.
2. Why does my motherboard show Q-code 67 during boot?
Q-code 67 typically indicates an issue during CPU DXE Initialization, often related to RAM or CPU configuration. It may be caused by faulty hardware, loose connections, or overclocking settings. Reseating RAM or updating the BIOS can often resolve it.
3. Is CPU DXE Initialization a serious issue if my system boots fine?
If your system boots and operates normally, the message or Q-code (e.g., 63–67) is likely informational, indicating the DXE phase is active. However, if the system hangs or exhibits instability, further troubleshooting is needed.
4. How can I fix a system stuck on CPU DXE Initialization?
Start by checking hardware connections, reseating RAM, and updating the BIOS. Test with minimal components (e.g., one RAM stick, no GPU) and reset CMOS if necessary. If the issue persists, test individual components for faults.
5. Can overclocking cause CPU DXE Initialization errors?
Yes, overclocking the CPU or RAM beyond stable limits can disrupt the initialization process, leading to errors like Q-code 67. Adjusting voltages, timings, or reverting to default settings can help stabilize the system.
Conclusion
CPU DXE Initialization is a critical yet often overlooked part of your computer’s boot process. By configuring the CPU and its components, it ensures your system is ready to run efficiently. While errors like Q-codes 63–67 can be concerning, they are often resolvable through simple troubleshooting steps like reseating RAM, updating firmware, or verifying hardware compatibility. By understanding this process and how to address potential issues, you can maintain a stable and high-performing system. For persistent problems, consult your motherboard’s manual or seek professional assistance to diagnose hardware faults.