Formatting a disc might sound technical, but it’s a simple and helpful process. Whether clearing old files, fixing errors, or preparing a disc for new use, formatting ensures your storage device works efficiently.
You cannot format a disc directly using a personal word processor. Instead, use your computer’s built-in tools, like File Explorer (Windows) or Disk Utility (Mac), to efficiently format discs, DVDs, or hard drives.
This guide will walk you through every step, explain why formatting matters, and provide tips to make the process smooth and stress-free. Let’s get started!
What Is Disc Formatting:
Disc formatting is clearing all the data on a storage device and preparing it to store new files. Think of it as giving your disc a fresh start.
It’s helpful when you want to reuse a disc, fix errors, or organize it for new data. Formatting also ensures your computer can properly read and write files to the disc.
Remember, it erases everything on the disc, so permanently save essential files before formatting. It’s a quick and straightforward way to get your disc ready for use.
Types of Discs You Might Use:

There are different types of discs you might need to format, each serving unique purposes:
- CDs (Compact Discs) are great for storing music, photos, or small files. They hold about 700 MB of data.
- DVDs (Digital Versatile Discs): Perfect for larger files like movies or software. They can store 4.7 GB or more on dual-layer discs.
- USB Drives (Flash Drives) are small, portable, and versatile, with storage sizes ranging from a few GB to several TB, ideal for almost any data type.
Choose the one that fits your needs!
Why Should You Format a Disc:
Formatting a disc is a necessary process that offers several benefits:
- Clear Old Data: It completely erases all files, giving your disc a fresh start. This is helpful when you no longer need the old data or want to repurpose the disc.
- Fix Errors: If your disc shows errors, like corrupted or unreadable files, formatting can often fix these problems and make the disc usable again.
- Prepare for New Use: Formatting ensures the disc is properly organized and ready for storing new files, especially if it’s reused or brand-new.
By formatting, you can keep your storage devices efficient and error-free. However, always back up any critical files beforehand since formatting permanently deletes all existing data!
Also Read: LGA 1151 CPU List – A Complete Guide (2025)
Getting Ready to Format Your Disc:
Before you start formatting a disc, take a few simple steps to avoid problems:
- Backup Your Data: Formatting erases everything on the disc, so save any critical files somewhere safe.
- Choose the Right File System: Decide whether to use NTFS, FAT32, or exFAT. Each one works best for specific devices or systems.
- Check Your Tools: Formatting isn’t done through a word processor. Use your computer’s built-in tools, such as File Explorer (Windows) or Disk Utility (Mac).
With these steps, you’re ready to format safely and confidently!
For Windows Users:
Here’s how to format a disc on a Windows computer, step by step:
- Insert the Disc: Plug your USB drive, CD, or DVD into the appropriate slot or port on your computer.
- Open File Explorer: To open File Explorer, use the shortcut Win + E or click the folder icon in the taskbar.
- Locate Your Disc: Look under “This PC” or “My Computer” to find your storage device. It will usually appear as a removable drive.
- Right-Click on the Disc: Once you’ve found your device, right-click its icon and select “Format” from the dropdown menu.
- Choose File System: A window will pop up. Choose the file system you need—NTFS for Windows-only use, FAT32 for older systems, or exFAT for compatibility with both Windows and Mac.
- Adjust Settings (Optional): If necessary, you can rename the disc or change other settings, such as allocation unit size.
- Start Formatting: Click “Start” and confirm the warning that all data will be erased.
- Wait for Completion: The process usually takes a few minutes. Once done, a message will appear confirming the disc is formatted and ready for use.
It’s an easy and reliable way to refresh your disc for new storage needs!
For Mac Users:

Here’s how to format a disc on a Mac in simple steps:
- Insert the Disc: Plug your USB drive, CD, or DVD into your Mac.
- Open Disk Utility: Go to Applications > Utilities > Disk Utility to access the tool.
- Select Your Disc: Find your disc in the left-hand sidebar and click on it.
- Click Erase: At the top of the Disk Utility window, click the “Erase” button.
- Choose a Format: Pick a file system, like exFAT (for both Mac and Windows use) or Mac OS Extended (for Mac-only use).
- Rename the Disc (Optional): Give your disc a new name.
- Confirm and Erase: Click “Erase” again to start the process.
- Wait for Completion: After a few minutes, the disc will be ready to use.
Formatting on a Mac is simple and quick with Disk Utility!
Tips for Successful Disc Formatting:
1. Always Backup Your Data
Save any important files before formatting. Formatting erases everything, and it’s hard to get it back once it’s gone.
2. Pick the Right File System
Choose a file system that works for your needs. NTFS is great for Windows, exFAT works on Windows and Mac, and FAT32 is ideal for older devices.
3. Label Your Disc
After formatting, give your disc a name. This will help you remember what’s on it and avoid confusion later.
4. Use the Correct Tools
Use built-in tools like File Explorer (Windows) or Disk Utility (Mac). Avoid third-party apps unless necessary.
5. Keep Your Disc Clean
Before formatting physical discs like CDs or DVDs, make sure they’re clean and scratch-free. Dirty or damaged discs may not work correctly.
6. Check Compatibility
If you’re sharing the disc between devices or operating systems, choose a file system like exFAT to ensure smooth compatibility.
Must Read: What AMD Processor Is Equivalent To The I7: Secret Guide!
Troubleshooting Common Problems:
1. Disc Not Recognized
If your computer doesn’t see the disc, try reinserting or restarting it. Ensure the disc is connected correctly, and check if the drive works.
2. Formatting Errors
Suppose you get an error message while formatting; try using a different file system or another disc. The current disc might be damaged or incompatible.
3. Slow Formatting
If formatting takes too long, close any unnecessary programs on your computer. This frees up resources and speeds up the process.
4. Disc Still Showing Errors After Formatting
It could be physically damaged if the disc still doesn’t work after formatting. Consider replacing the disc or using recovery software to check for issues.
5. Wrong File System Chosen
If the disc doesn’t work on another device, you may have selected the wrong file system. To improve compatibility, reformat the disc with a system like exFAT.
How Do I Format A Disc On Personal Word Processor Windows 10
Formatting a disc on Windows 10 is simple. Insert the disc, open File Explorer, and locate your disc under “This PC.” Right-click it, select “Format,” choose a file system like NTFS or exFAT, and click “Start.” Wait for the process to finish, and your disc will be ready!
How Do I Format A Disc On Personal Word Processor Windows 11
On Windows 11, formatting a disc works similarly to Windows 10. Insert the disc, open File Explorer, find the disc under “This PC,” right-click it, and select “Format.” Choose the correct file system, confirm the action, and click “Start.” After a few minutes, your disc will be formatted.
How Do I Format A Disc On Personal Word Processor Mac
To format a disc on a Mac, use Disk Utility. Insert the disc, open Disk Utility from Applications > Utilities, select your disc, and click “Erase.” Choose a format like exFAT for cross-compatibility or Mac OS Extended for Mac-only use. Confirm the action and your disc will be ready!
Disk Management Windows 10
Disk Management is a built-in tool in Windows 10 that helps you view, create, delete, format, or resize hard drive partitions. You access it by right-clicking the Start button → Disk Management. Use it carefully to manage storage without losing data.
Read More: How To Enable Processor Lombok In Intellij: Complete Guide
Disk Management Windows 11
In Windows 11, you can open Disk Management by right-clicking the Start menu and choosing Disk Management. It gives you control to create, delete, format, or change partitions. Use it when you want to manage disk space without extra software.
How To Format Hard Drive (Windows 10)
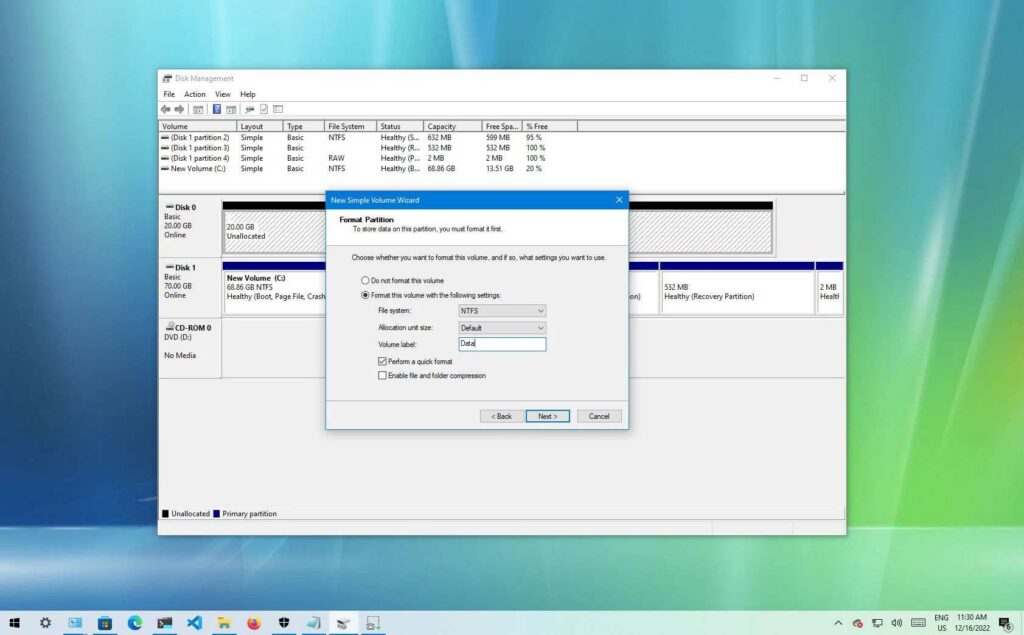
Right-click the drive in File Explorer → select Format, choose a file system (ex: NTFS or exFAT), pick allocation size (default is fine), check or uncheck Quick Format, click Start, and confirm. That wipes the drive and sets up its file system.
How To Partition Hard Disk In Windows 10
Open Disk Management, right-click on free or shrink space, select New Simple Volume, set size, assign a drive letter, and finish the wizard. The disk splits into separate sections so you can keep files, system data, or backups apart.
How To Partition Laptop Hard Drive In Windows 11
Open Disk Management, right-click on unallocated space or shrink an existing partition, choose New Simple Volume and assign a drive letter and size. Click Finish. This will divide your hard drive into separate “parts” that the computer treats as different drives.
How To Format A New Hard Drive On Windows 10
After installing or connecting the drive, open Disk Management, find the new drive, right-click → Initialize Disk (if needed), then right-click the partition → Format, choose file system and label, click OK. The drive becomes usable by Windows.
Is There A Way To Format My NAS Drives With Just A PC?
It depends on your NAS. Many NAS devices require you to format drives via their web interface or OS. But if you remove the drives, you can format them on your PC using Disk Management or command line—but they may not work in the NAS afterward.
How To Initialize And Format A New Hard Drive In Windows 10
Go to Disk Management, find the disk marked Unknown and Not Initialized, right-click → Initialize Disk, choose partition style (MBR or GPT). Then right-click the unallocated space → New Simple Volume, format it, and assign a drive letter.
How Do I Format A Computer Tb Hard Drive For A Computer To Pick It Up?
Make sure the drive is connected properly, open Disk Management, find it (often as unallocated), right-click → Initialize, then right-click the new area → New Simple Volume, format it, choose a file system, assign a letter, and finalize.
FAQs
1. How do I Format a disk drive on my computer?
To format a disk drive, open File Explorer, right-click the drive, select “Format,” choose a file system, and click “Start.” Wait for completion.
2. How to Format a word document quickly?
To format a Word document, use the toolbar to adjust fonts, align text, and set margins. For quick formatting, apply headings, bullet points, or templates.
3. How do I Format a document?
Formatting a document involves setting fonts, spacing, margins, and headings. Use your word processor’s toolbar to customize and organize your text for easy readability.
4. What are the formatting features of word processor?
Word processors offer features like font styles, text alignment, bullet points, page layouts, and tables. These tools make your document organized, professional, and easy to read.
5. How do I manually format a disk?
Insert the disk, open File Explorer or Disk Utility, locate the disk, select “Format,” choose a file system, and confirm. This clears all data and prepares it.
6. How to format a CD?
Insert the CD, open File Explorer (Windows) or Disk Utility (Mac), select the CD, click “Format” or “Erase,” choose settings, and confirm to format the CD.
7. Should you format a disk?
Yes, if you need to clear old data, fix errors, or prepare the disk for new use—always back up important files before formatting to avoid data loss.
8. How do I format my computer using a CD drive?
Insert the installation CD, restart your computer, and boot from the CD. Then, follow the on-screen instructions to format your hard drive and reinstall the operating system.
9. How do you solve “you need to format the disk in drive”?
If possible, back up your files, then format the disk using your computer’s tools. Right-click the drive, select “Format,” choose settings, and confirm.
10. What is the difference between word processing and word processor?
Word processing is creating and editing documents, while a word processor (like Microsoft Word) is the software used to perform this task.
Conclusion
Formatting a disc is a straightforward process that clears old data, fixes errors, and prepares it for new use. While word processors can’t format discs, tools like File Explorer (Windows) and Disk Utility (Mac) make it easy. Always back up important files and choose the correct system for your needs. The proper steps and tips make formatting quick, efficient, and stress-free!