When setting up a virtual machine (VM) in VMware, understanding how to configure processors and cores is essential for getting the best performance, especially when running an operating system like Windows 11.
For a Windows 11 VMware VM, assign at least 2 CPU cores. Windows 11 supports up to 32 processors. Allocate around 50-75% of your host’s physical cores to ensure optimal performance and compatibility.
In this guide, we’ll explore the key concepts of VMware CPU settings, such as the number of processors and cores per processor, and how to adjust these settings to optimize performance.
Understanding Windows 11 System Requirements
Before setting up Windows 11 on your physical or virtual machine, ensuring that your system meets the hardware and software requirements for optimal performance is important. Below are the key system requirements for running Windows 11:
1. Processor (CPU)
- Architecture: 64-bit processor
- Clock Speed: At least 1 GHz
- Cores: Minimum of 2 cores
- Compatibility: The processor must be on the list of supported models for Windows 11. This includes modern processors from Intel, AMD, and Qualcomm. For example, Intel’s 8th Gen or newer processors, AMD Ryzen 2000 series or newer, and Snapdragon 850 or later.
2. Memory (RAM)
- Minimum RAM: 4 GB or more
- Recommended RAM: 8 GB or more for better performance, especially when running multiple applications or virtual machines.
3. Storage

- Minimum Storage: 64 GB of available storage or more
- Recommended: 128 GB or higher for smoother operation, especially if you plan on storing many files or installing numerous applications.
- Note: Storage may need to be expanded over time with Windows updates and additional apps.
4. Graphics
- Graphics Card: DirectX 12 compatible graphics card or integrated GPU
- WDDM: Windows Display Driver Model (WDDM) version 2.0 or higher
- Display: A display with at least 720p resolution, a 9″ or larger diagonal screen, and at least 8 bits per color channel.
5. System Firmware
- UEFI: The system must support UEFI (Unified Extensible Firmware Interface) and Secure Boot. Legacy BIOS systems are not supported for Windows 11.
6. TPM (Trusted Platform Module)
- TPM Version 2.0: A key requirement for Windows 11 to enhance security features such as BitLocker encryption and secure boot. TPM must be enabled in the system’s firmware settings.
Also Read: 32 Bit Apps Can Only Run On 32 Bit Processors: Guidance!
Microsoft’s requirement vs. what VMware can present
Microsoft’s Windows 11 minimum explicitly states: a 64-bit processor, 1 GHz or faster, with two or more cores. That is only the minimum for installation — it does not mean “two cores is ideal” for everyday use in a VM.
For practical usage, Microsoft and Microsoft-recommended guidance for session hosts indicate that modern workloads usually benefit from at least 2 physical cores per VM and often 4 vCPUs for a smooth interactive experience.
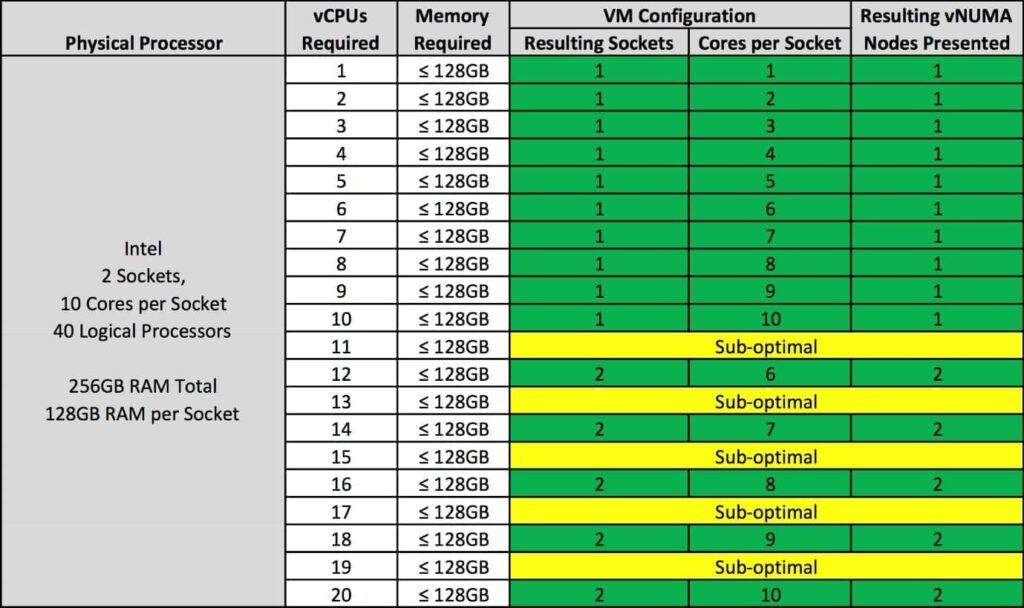
When you configure the VM in VMware tools (Workstation, ESXi, Fusion, vSphere), you can choose the number of vCPUs and sockets. But beware: Windows and some apps may react differently if you present many sockets instead of cores-per-socket.
For example, setting 2 sockets × 2 cores-per-socket = 4 vCPUs can be presented differently than 1 socket × 4 cores. Some VMware community threads report Windows only showing 4 cores even when 8 are configured due to cores-per-socket and Windows’ handling of socket limits.
Configuring CPU Resources in VMware for Windows 11
Here are simple steps for configuring the CPU resources for your Windows 11 virtual machine (VM) in VMware:
1. Choose the Number of Processors (vCPUs):
- VMware lets you choose how many virtual processors (vCPUs) to give your VM.
- For Windows 11, it’s recommended to use at least 2 vCPUs.
- More vCPUs will improve performance, especially for heavy tasks.
2. Set the Number of Cores per Processor:
- Each virtual processor can have multiple cores.
- For example, you can choose 2 vCPUs with 2 cores each, giving you 4 cores in total.
- This will help your VM handle more tasks at once.
3. Use CPU Compatibility Settings:
- Make sure your virtual processor is compatible with Windows 11 features.
- If your CPU is old, VMware can help by emulating newer CPU features.
4. Avoid Overcommitting Resources:
- Don’t give too many vCPUs to your VM if your host computer doesn’t have enough power.
- It’s important to leave enough CPU resources for your host machine.
5. Adjust Based on Your Needs:
- For light tasks (browsing emails), 2 vCPUs should be enough.
- For heavy tasks (gaming, video editing), consider using more vCPUs or more cores.
6. Ensure VMware Version is Updated:
- Always use the latest VMware version to ensure better compatibility with Windows 11.
7. Check Host System’s Capacity:
- Your host system (the physical computer) must have enough CPU power to handle multiple VMs if you run more than one.
By following these steps, you can ensure your Windows 11 VM runs smoothly and has enough CPU resources.
Steps to Configure CPU Settings in VMware Workstation
Follow these easy steps to configure CPU settings for your Windows 11 virtual machine in VMware Workstation:
- Step 1: Open VMware Workstation:
- Launch VMware Workstation on your computer.
- Step 2: Select Your Windows 11 VM
- Click on the virtual machine (VM) you want to configure.
- Step 3: Go to VM Settings
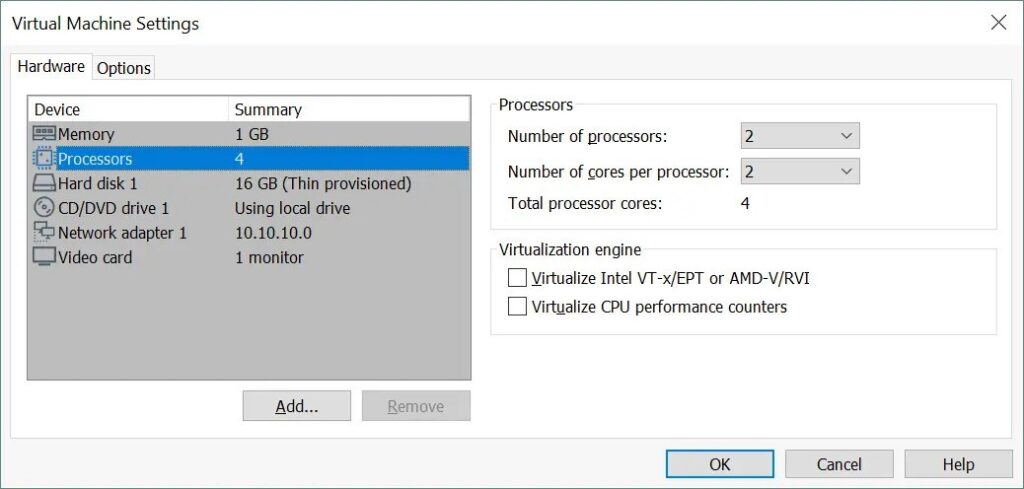
- Right-click on your VM, select “Settings,” or click the “Edit virtual machine settings” button.
- Step 4: Open the Processors Tab
- Find and click on the “Processors” tab in the settings window.
- Step 5: Adjust the Number of CPUs
- Set the number of virtual processors (vCPUs) you want to assign to your VM.
- For Windows 11, at least 2 vCPUs are recommended, but you can choose more if needed.
- Step 6: Set the Number of Cores per Processor
- Decide how many cores each virtual processor should have (e.g., 2 cores per processor).
- You can assign more cores to improve performance.
- Step 7: Save Changes
- After adjusting the settings, click OK to save and apply the changes.
- Step 8: Start Your VM
- Once the CPU settings are configured, start the VM to use the new settings.
These steps will help you configure the CPU settings for your Windows 11 virtual machine in VMware Workstation.
Read Out: Issuer Processor: Key Differences Explained In 2025
Considerations for Optimal Performance
To get the best performance from your Windows 11 VM, it’s important to allocate the right resources. Make sure your VM has enough CPU cores, RAM, and disk space based on your needs.
Avoid over-committing resources, as it can slow down both the VM and the host system. Regularly check the VM’s performance and adjust CPU and memory settings to ensure smooth operation if needed. Keep your VMware version updated for better compatibility.
Advanced Configuration: Enabling TPM and Secure Boot
To run Windows 11 on VMware, you must enable TPM (Trusted Platform Module) and Secure Boot for better security. Here’s how to do it:
- Enable UEFI Firmware: Go to the VM settings and select UEFI as the firmware type under the “Options” tab.
- Enable Secure Boot: In the same settings area, turn on Secure Boot.
- Add TPM: In the VM settings, go to Advanced and add a TPM device to the virtual machine.
This ensures the VM meets Windows 11’s security requirements.
Troubleshooting Common Issues
While setting up Windows 11 on VMware, you may face some issues. Here’s how to solve common problems:
- VM Doesn’t Meet Windows 11 Requirements: If you get an error saying the VM isn’t compatible, ensure TPM 2.0 and Secure Boot are enabled in the VM settings.
- Slow Performance: Try increasing the allocated CPU cores and RAM if the VM runs slow. Ensure your host system has enough resources, too.
- Windows 11 Won’t Install: Ensure your VMware version supports Windows 11 and the virtual hardware is correctly configured.
VMware Number of Processors Vs Cores
The number of processors in VMware refers to how many virtual CPUs (vCPUs) you assign to your VM. Cores per processor is the number of cores each vCPU uses. More cores generally improve performance but require more resources.
Windows 11 CPU Requirements
Windows 11 needs a 64-bit processor that runs at 1 GHz or faster with at least two cores. It also requires compatibility with Secure Boot and TPM 2.0. These CPU rules ensure smooth performance and security.
Windows 11 Recommended System Requirements
For best Windows 11 performance, use a modern multi-core CPU like Intel Core i5, i7, or AMD Ryzen 5 or above. Pair it with 8–16GB RAM and SSD storage. Recommended specs give faster apps, updates, and multitasking.
Vmware Processors Vs Cores
In VMware, “processors” mean virtual sockets, while “cores” are inside each processor. Together, they form the total vCPUs assigned to a VM. Windows detects them as CPU resources, but the balance matters for licensing, performance, and proper scheduling.
Windows 11 Minimum Requirements
Windows 11 requires a 64-bit CPU with at least two cores, 4GB RAM, and 64GB storage. It also needs UEFI firmware, TPM 2.0, and Secure Boot enabled. Meeting minimum specs allows installation but not always smooth everyday performance.
Don’t Miss: 00326-00823-6-412-Aa0em Can You Replace Processor?
1 vCPU = How Many Cores VMware
A 1 vCPU can have multiple cores, depending on your settings. For example, choosing 1 vCPU with 2 cores will behave like a CPU with 2 cores. VMware allows you to configure the number of cores per vCPU.
How Many Cores and Processors for Windows 11 VMware VM 2020
For a Windows 11 VM, assigning 2 vCPUs and at least 2 cores per processor is recommended. This setup ensures Windows 11 runs smoothly without performance issues. VMware should also support TPM and Secure Boot for compatibility.
VMware CPU Cores Per Socket Best Practice
The best VMware practice is assigning 2 to 4 cores per CPU socket. This offers a good balance between performance and system resources. Avoid assigning too many cores, which could overload your host machine and slow the VM.
How to Check Number of Cores in Virtual Machine Linux
To check the number of cores in a Linux VM, open the terminal and run the command: lscpu. This will display detailed information about the CPU, including the number of cores assigned to the virtual machine.
VMware Windows 11 Processor Not Supported
If VMware shows an error saying your Windows 11 processor is not supported, ensure you use a supported processor (Intel 8th Gen or newer, AMD Ryzen 2000+). Also, enable TPM 2.0 and Secure Boot in VM settings.
How Many Cores Per CPU
The number of cores per CPU depends on the processor model. You’ll find 4 to 16 cores per chip for most modern CPUs. When setting up a virtual machine, you can choose how many cores to allocate to the VM.
How Many Processors for Virtual Machine
You typically start with 2 processors (vCPUs) for a virtual machine, which should be enough for most basic tasks. Depending on your host system’s capacity, more vCPUs may be necessary for demanding applications like video editing or gaming.
FAQs
1. Windows 10/11 Vs Windows Server As Virtual Machine
Windows 10/11 is designed for individual use, while Windows Server is built for business environments. Choose based on your needs.
2. What Would You Do? Assign Number of Processors and Cores
Assign 2 vCPUs and 2 cores per processor for basic use. Increase processors and cores for heavy tasks.
3. Windows 11 VM Only Shows 4 Cores Instead of Configured 8 Cores
Check VMware settings for correct core allocation. Ensure the host supports the configured number of cores for the VM.
4. VMware Guest OS Only Shows 2 CPUs When 8 Are Configured
Ensure the guest OS supports multiple CPUs. Sometimes, the OS limits the number of cores it can recognize.
5. How Does Setting Numbers of Cores Per Processor Work?
Setting cores per processor allows you to divide the virtual CPU’s resources. More cores per processor can boost performance.
6. How To Set Cores Per Socket to 1 For Windows 11 VM in ESXi?
In ESXi, open the VM settings, go to Processors, set Cores per Socket to 1, then save and restart the VM.
Conclusion
In conclusion, configuring the right number of processors and cores for your Windows 11 VMware VM is crucial for optimal performance. Properly allocate CPU resources, enable TPM and Secure Boot for security, and adjust settings based on your VM’s workload.